Interactive design-Exercise
Start From 28.08.2023
28.08.2023 - 16.10.2023/Week 1-Week 8
Kong Cai Yi / 0363862
Interactive design / Bachelor of Design (Hons) in Creative
Media
Exercise

INDEX
- Lectures: All lectures in Project 1/Prototype Design
- Exercise 1: Web Analyst
- Exercise 2: Replicate a website
- In-class exercise:Create a Personal Profile Webpage
- Exercise 3: Creating a recipe card
INSTRUCTIONS
<iframe
src="https://drive.google.com/file/d/131kfj0FzZefJeIRNVXvbSKwWB1m6VhnZ/preview"
width="640" height="480" allow="autoplay"></iframe> <span id="Week 3"></span>
Instructions:


- Format: Google Slide
- Choose TWO (2) websites from the link given. Review the website that you've selected carefully, taking note of its design, layout, content, and functionality. Identify the strengths and weaknesses of the website, and consider how they impact the user experience.
- Write a brief report summarizing your findings and recommendations.
- Deliverables:Write a brief report summarizing in not more than 500 words. We can include a screen capture of each section or page of the website to explain. Make sure that the formatting of the report is clear (heading/subheadings)
- What To Have in The Analysis:
- Consider the purpose and goals of the website, and evaluate whether they are effectively communicated to the user.
- Evaluate the visual design and layout of the website, including its use of color, typography, and imagery.
- Consider the functionality and usability of the website, including its navigation, forms, and interactive elements.
- Evaluate the quality and relevance of the website's content, including its accuracy, clarity, and organization.
- Consider the website's performance, including its load times, responsiveness, and compatibility with different devices and browsers.
Progression:
Google Slide:
Slide:https://docs.google.com/presentation/d/11bgutj8wCBWrPWgbkthd8G4MuZyCz97LWNjytp_oU68/edit?usp=sharing


Fig 1.1 Web analysis ( 30.08.2023-Week 1)
Week 2 | Exercise 2/ Replicate a website
Instructions:
- Replicate TWO (2) existing main pages of the websites given in the link below to gain a better understanding of their structure.
- Follow the dimensions of the existing website from the width and height.
- We are allowed to use any image from stock image or free stock icon. The image that we will be using does not have to be an exact image from the original website. We may replace it with a similar image.
- Focus on the layout, type style, and color style. To find similar typefaces/fonts, you can download fonts from Google Fonts. You may need to screengrab the website and can begin to replicate the page.
- Choose any two from the link given:
Screenshot Main Page

Fig 2.1 Screenshot full size of website (8.9.2023-Week 2)
.png)
.png)
Fig 2.2 Screenshot full size of website (8.9.2023-Week 2)
Progression in AI


Fig 2.3 Progression in AI (10.9.2023-Week 2)
Final Replicated a website

Fig 2.4 Final replicated website#1 (10.9.2023-Week
2)

Fig 2.5 Final replicated website#2 (10.9.2023-Week 2)
COMPARE
#1 replicated website
ORIGINAL
REPLICATED
Fig 2.6 Comparison#1 (10.9.2023-Week 2)
#2 replicated website
ORIGINAL
REPLICATED
Fig 2.7 Comparison#2 (10.9.2023-Week 2)
Week 4 | In-class exercise/Create a Personal Profile Webpage
Instructions:
In this task, we will create a personal profile webpage that includes
basic information about yourselves. This exercise will require them to
apply the HTML skills they've learned.
HTML Structure:
Begin by creating a new HTML file and setting up the basic structure with <!DOCTYPE html>, <html>, <head>, and <body> elements.
Page Title:
Inside the <head> element, add a <title> element with a title for your webpage, like "My Profile."
Header Section:
If possible, publish your webpage online using a free web hosting service or GitHub Pages.


.png)
.png)
.png)


HTML Structure:
Begin by creating a new HTML file and setting up the basic structure with <!DOCTYPE html>, <html>, <head>, and <body> elements.
Page Title:
Inside the <head> element, add a <title> element with a title for your webpage, like "My Profile."
Header Section:
- In the <body> section, create a header section using the <header> element.
- Add a main heading (<h1>) with your name.
- Optionally, include a subheading (<h2>) with a brief tagline or description.
- Create a section for information about yourself.
- Include a <h3> heading saying "About Me."
- Add a couple of paragraphs (<p>) with a brief introduction of yourself.
- Create another section to list your interests or hobbies.
- Use an appropriate heading, such as <h3>: "My Interests."
- Add an introduction for this section using <p>.
- Create an unordered list (<ul>) and list some (more than 3) of your interests using <li> elements.
- Insert an image of yourself using the <img> tag.
- Specify the image source (src attribute) and provide a brief description using the alt attribute.
- Create a contact section with an appropriate heading.
- Include your email address and optionally other contact details like your social media profiles or phone number using the list item.
- Test your webpage by opening it in a web browser to ensure everything displays correctly.
- Use online HTML validators to check for any syntax errors and fix them if needed.
If possible, publish your webpage online using a free web hosting service or GitHub Pages.
FINAL OUTCOME

Fig 3.1 HTML Progress and outcome(19.09.2023-Week 4)

Fig 3.2 Netlify(19.09.2023-Week 4)

Fig 3.3 Testing and Validation(19.09.2023-Week 4)
Week 5
After Modify and + CSS element:
http://127.0.0.1:50281/preview/app/index.html


Fig 3.4 Adding CSS into week 4 exercise (25.09.2023-Week 5)
Week 6 | Exercise 3/ Creating a recipe card
Instructions:- In this exercise, you will create a recipe card using HTML and CSS.
- The goal is to design a basic webpage that displays a recipe's ingredients and instructions in a visually appealing format.
- Create an HTML file named "index.html."
- Create a section that displays the following information:
- Recipe title
- Include necessary images for the page
- List of ingredients
- Step-by-step cooking instructions
- Create an external CSS file named "style.css."
- Apply CSS rules to style your recipe card.
- Use CSS selectors such as element selectors (e.g., body, h1, ul), class selectors (e.g., .recipe-title, .ingredient-list), and ID selectors (e.g., #instructions) to style different parts of the card.
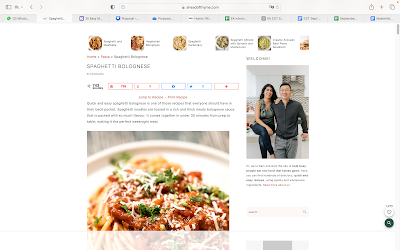
I decided to choose spaghetti bolognese as my recipe from the link
that Mr Shamsul has given.

Fig 4.1 Spaghetti Bolognese website (8.10.2023-Week 6)
I have created an index.html and style.css file as mention in the
instructions part.

Fig 4.2 Exercise 4 file (8.10.2023-Week 6)
I insert photo from the website and create my own tittle.

Fig 4.3 Process in html (8.10.2023-Week 6)
I added the from part at bottom which allow reader to fill in their
query of this recipe

Fig 4.4 Process in html (8.10.2023-Week 6)
This is the preview part of my recipe card

Fig 4.5 Preview (8.10.2023-Week 6)
I applied CSS rules and selector in my recipe such as background
colour, text-decoration, element selector, class selector and ID
selector.

Fig 4.6 Process in CSS (8.10.2023-Week 6)
.png)
.png)
.png)
Fig 4.7 Recipe card (8.10.2023-Week 6)
After applying box model:


Fig 4.8 Process in HTML & CSS (10.10.2023-Week 7)
FIINAL OUTCOME
HTML Preview file: http://127.0.0.1:50421/preview/app/index.html


Fig 4.9 Final Recipe card (10.10.2023-Week 7)


Comments
Post a Comment